How Claude Code Works, Part 2: Context, Control, Configuration
Part 1 built the stack from scratch: tokens, prompts, tools, the agent loop, context management, permissions, and automation. That covered how the machine works. This part covers how you shape what it does.
Over the past year, the configuration surface of AI coding agents has grown into something closer to a programming model. For this article I read through three major agent codebases, Claude Code, Codex, and OpenCode, to pull out the general principles and patterns they’ve converged on. All three adopted the same open standard (Agent Skills) for reusable workflows, and the concepts below apply across tools even when the specific file formats differ.
A note on sources: Codex and OpenCode are open source, so their code is on GitHub for anyone to read. Claude Code’s source was accidentally shipped as readable JavaScript in its npm package, and that’s how I was able to read it. The observations about Claude Code here come from that leaked code, not from any official documentation. I don’t reproduce any of it, and the focus throughout is on patterns that show up across all three rather than anything specific to one codebase.
If you haven’t read Part 1, start there. It covers Layers 1-7. If you haven’t read Part 2, keep going. If you’ve read both parts and are coming back for reference, here’s the full stack.
| Part | Layer | What it does |
|---|---|---|
| 1 | Token prediction | Text generation, one token at a time |
| 2 | Assembled prompt | System message, tools, context, history |
| 3 | Tool calling | Structured calls executed by the harness |
| 4 | Agent loop | Tool calls in a loop until done |
| 5 | Context management | Pruning, compaction, subagents, RAG |
| 6 | Permissions | Approval gates, permission modes |
| 7 | Automation | Non-interactive mode, webhooks |
| 8 | Skills | Reusable workflows, lazy-loaded |
| 9 | Hooks | Deterministic control over the loop |
| 10 | Custom subagents | Specialized agents for specific jobs |
| 11 | Agent SDK | The full loop as a library |
Context engineering
Before getting into the specific layers, it’s worth naming the discipline that ties them all together. Anthropic’s applied AI team calls it context engineering:
Prompt engineering is about writing good instructions for a single turn. Context engineering is about curating what goes into the model’s window across an entire session, turn after turn, as the pool of possible context (tool results, files, conversation history, memory) keeps growing.
The same principles show up in empirical research, in all three agent codebases, and in OpenAI’s experience building a product entirely with Codex agents where context management turned out to be the central engineering challenge. Here are the ones that matter most.
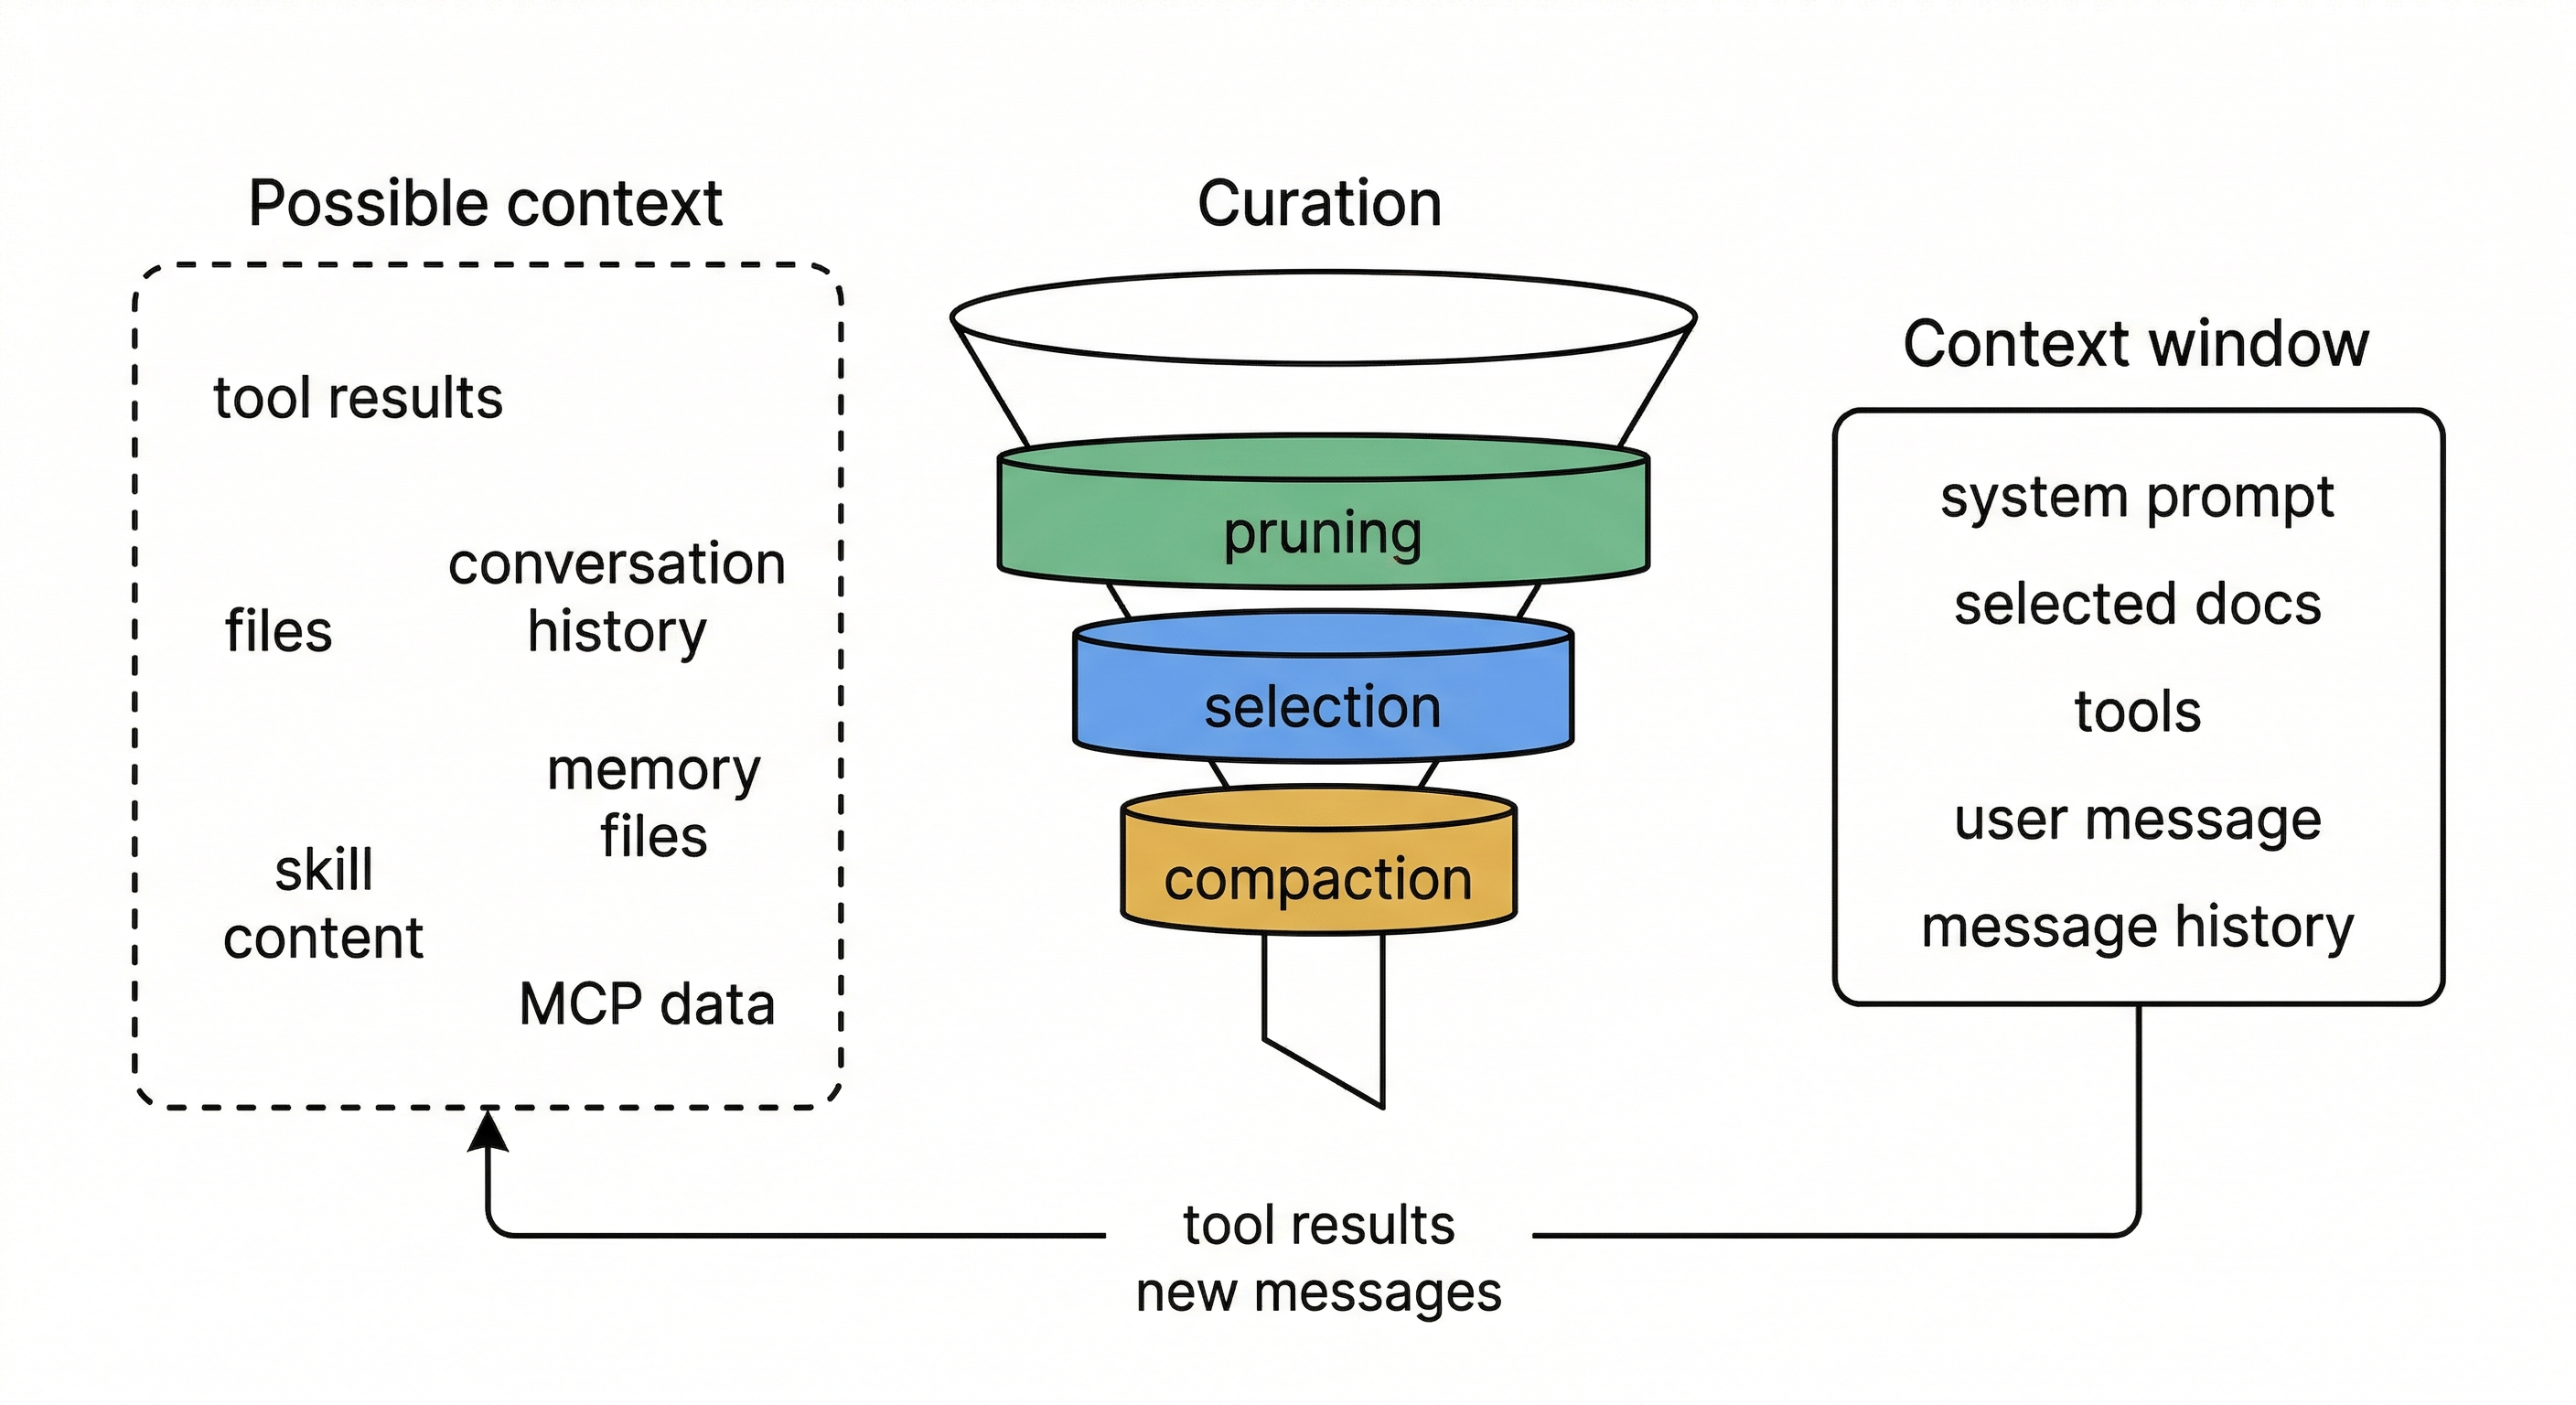
Context is a finite resource with diminishing returns. Every token you add competes for the model’s attention. The effective context window is smaller than the technical one: models degrade in recall and reasoning well before hitting the token limit. Research confirms this empirically: agents with unmanaged context growth solve fewer problems and cost more. Past a point, more context actively degrades performance.
Optimize for the smallest high-signal set. The goal of every design decision in the layers below is to find the minimum set of tokens that maximizes the chance of the desired outcome. Lazy-loading skills, scoping subagents to narrow tool sets, replacing old tool outputs with placeholders, returning summaries instead of raw work: all implementations of this one idea.
Layer your defenses, cheapest first. No single strategy handles every situation, so all three codebases stack several together. The cheapest one runs on every turn: swap old tool outputs for short placeholders. A more expensive one kicks in when the window gets close to full: ask an LLM to summarize the whole conversation. And a last-resort fallback catches the case where the API itself rejects the request as too large.
Each layer handles a different failure mode, and the cheap layers run often enough that the expensive ones rarely need to fire. This ordering matters: research shows that simple strategies (like placeholder replacement) often match or beat sophisticated ones (like LLM-powered summarization) at lower cost. Sophisticated strategies can even backfire by smoothing over failure signals that would have told the agent to stop, causing it to run longer without solving more problems.
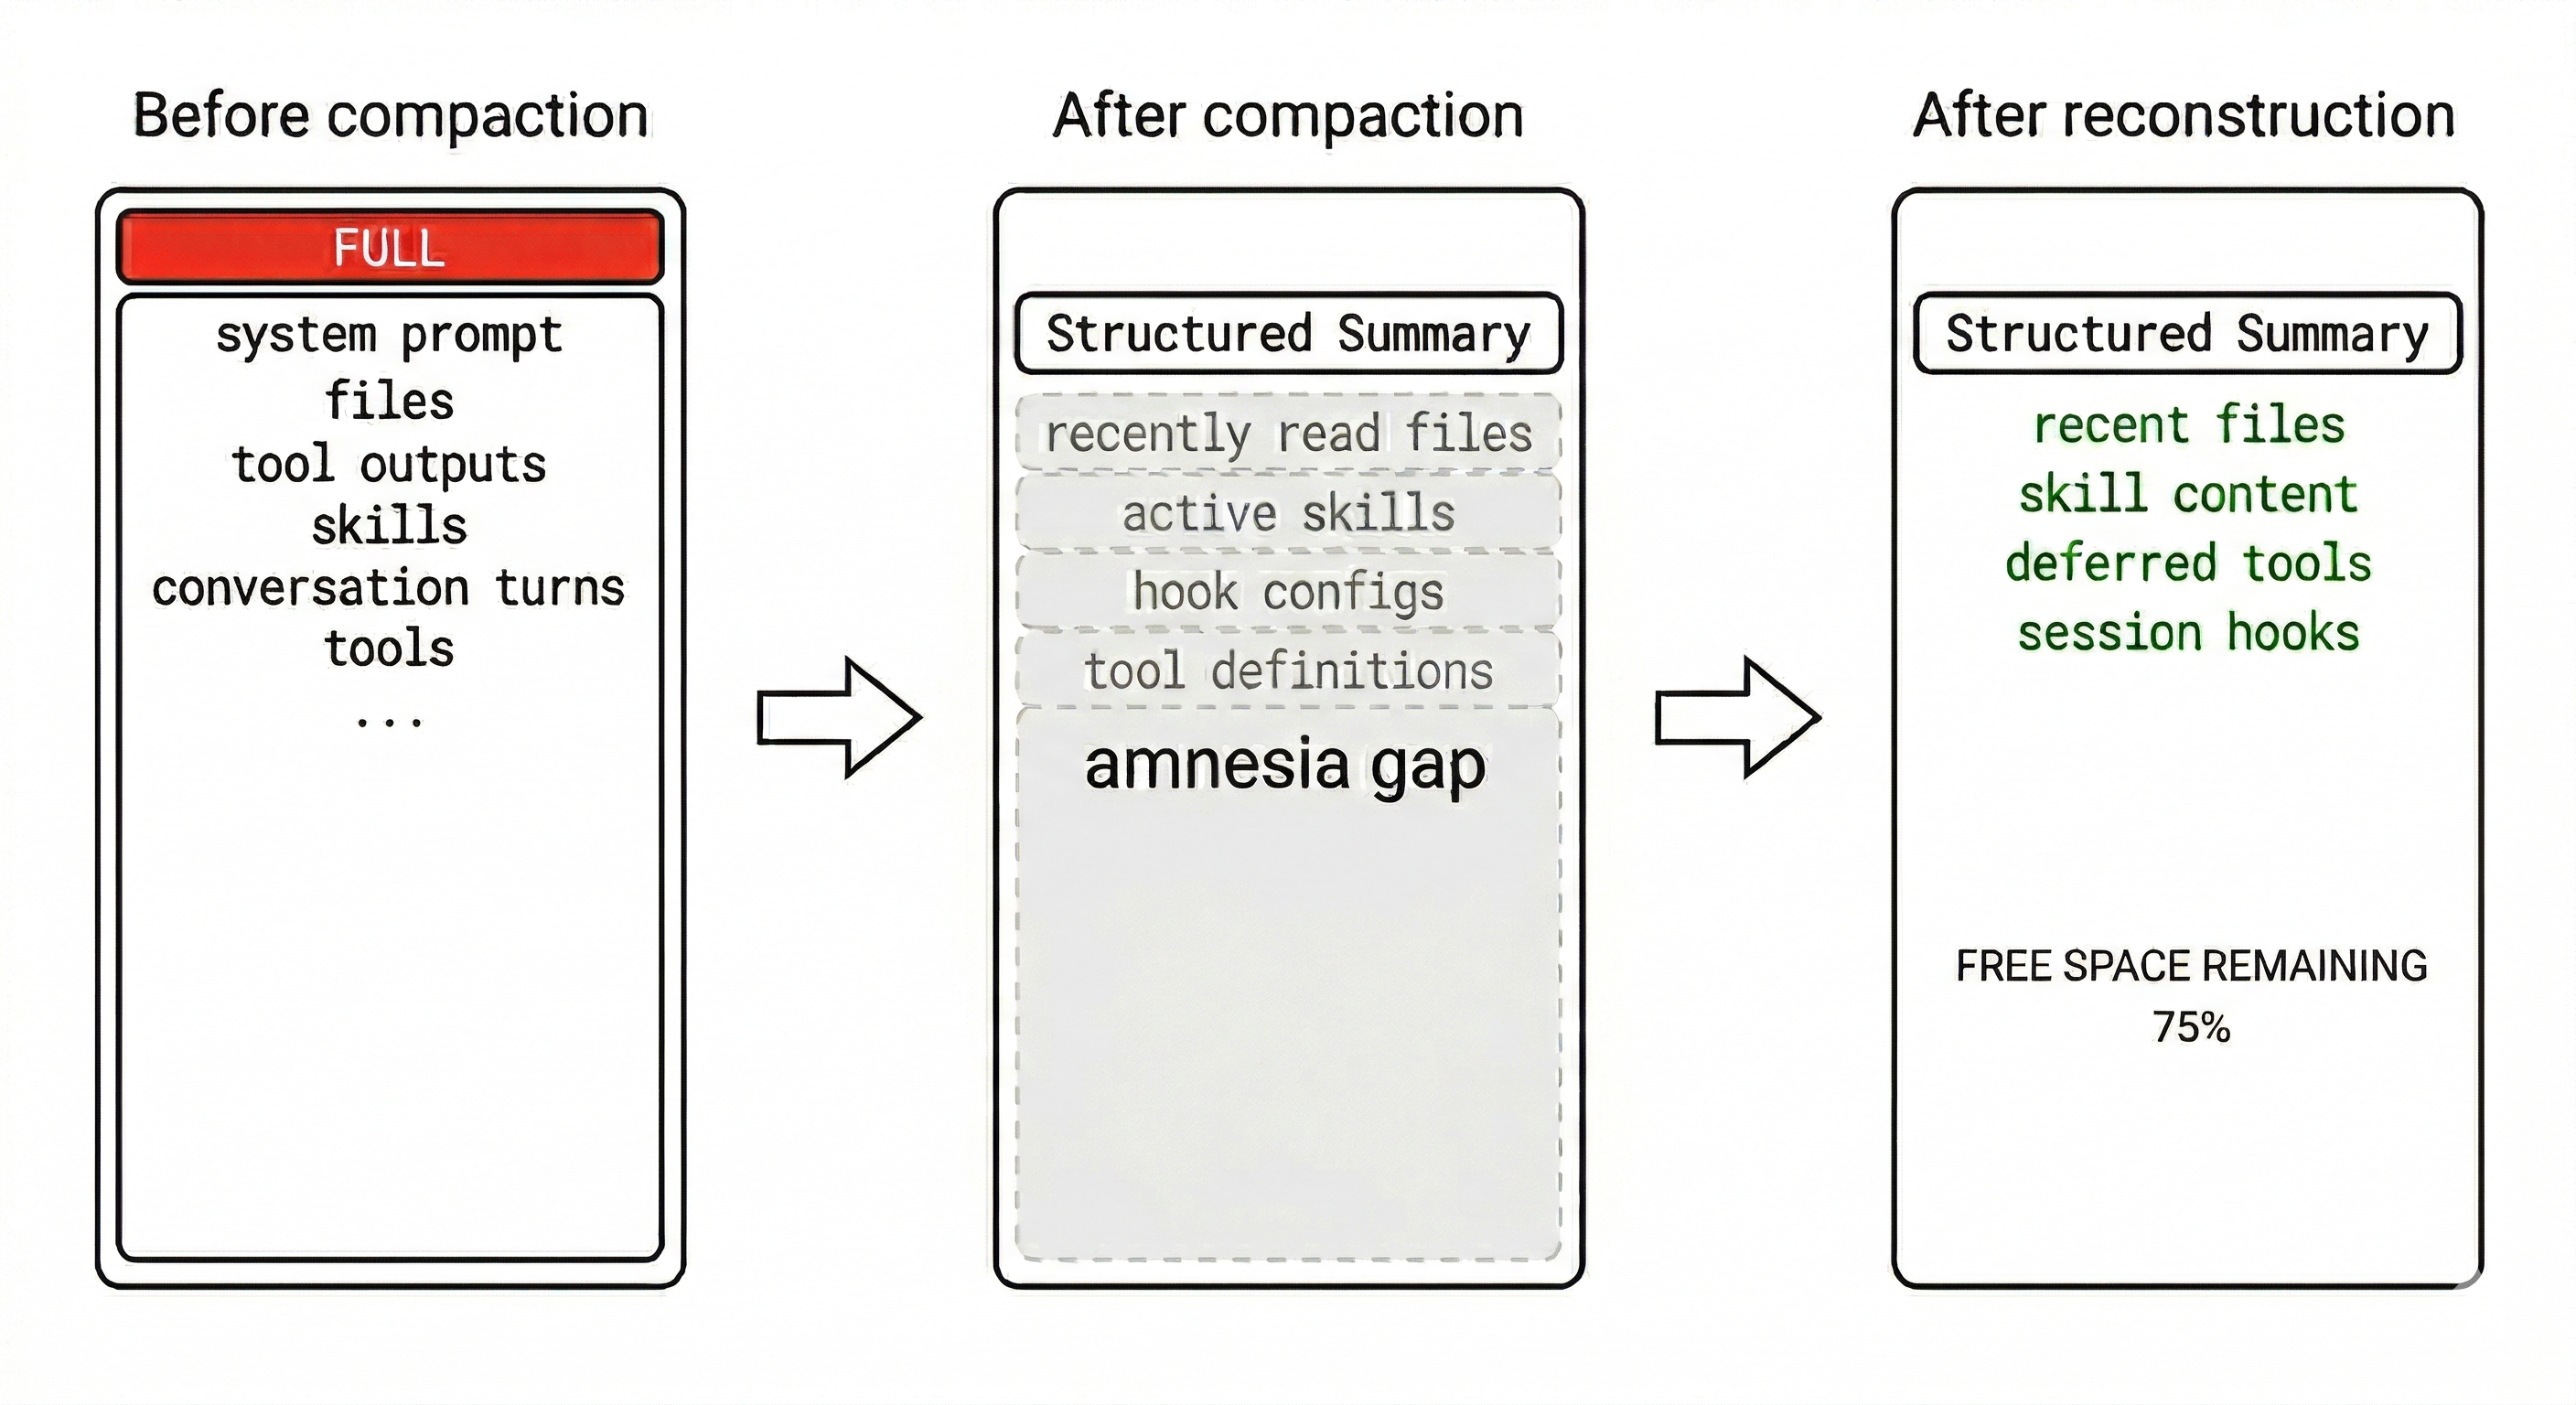
Structured summaries beat open-ended ones. When compaction does fire, how you ask the model to summarize matters. All three codebases use structured templates with specific sections (goal, pending tasks, key files, discoveries, next steps) rather than asking for a free-form summary. The template keeps the summary focused on what to do next rather than what already happened. Codex makes this explicit by framing the prompt as a “handoff to another LLM that will resume the task,” which means the summary is written to enable continuation, not to record history.
Reconstruction matters as much as compaction. Compacting the conversation creates an amnesia gap. The model loses access to recently read files, loaded skills, active hooks, and tool definitions that were announced earlier in the session. All three codebases actively repair this gap after compaction: re-injecting recently read files, re-attaching skill content, re-announcing deferred tools, and re-running session-start hooks. Without reconstruction, compaction trades one problem (context overflow) for another (a model that has forgotten its working state).
Instructions work best at the right altitude. Too specific and they become brittle logic that breaks on edge cases. Too vague and they assume shared context the model doesn’t have. The sweet spot is clear heuristics: specific enough to guide behavior, flexible enough that the model can adapt when conditions vary.
OpenAI’s harness engineering team found the same tradeoff in code architecture: they enforce invariants, not implementations. Strict dependency direction rules and custom linters enforce boundaries mechanically, but the agent has full freedom in how solutions are expressed within those boundaries. A rule like “parse data shapes at the boundary” is high-altitude. Requiring a specific library for it is low-altitude. This applies to skill instructions, custom agent system prompts, and no-shortcuts tables equally: encode what must be true, not how to make it true.
Prefer references over pre-loaded data. Agents work better holding lightweight identifiers (file paths, query handles, skill names) and loading content on demand than with everything stuffed into context upfront. Each layer below implements some form of this: skills lazy-load their full instructions, context commands run at invocation time, subagents return distilled results rather than their full working history.
Give the agent a map, not a 1,000-page instruction manual. When everything is “important,” nothing is. — OpenAI, Harness Engineering
OpenAI learned this directly. They tried a monolithic AGENTS.md containing all project instructions. It failed: the file crowded out the actual task, instructions rotted as the codebase changed, and the agent couldn’t distinguish current rules from stale ones. Their fix was to shrink AGENTS.md to roughly 100 lines that serve as a table of contents, pointing to a structured docs/ directory where the real knowledge lives:
AGENTS.md              ← ~100 lines, the map
ARCHITECTURE.md        ← top-level domain map
docs/
├── design-docs/       ← indexed, with verification status
├── exec-plans/
│   ├── active/        ← current work
│   └── completed/     ← decision history
├── references/        ← external docs, LLM-formatted
├── FRONTEND.md
├── SECURITY.md
└── RELIABILITY.md
The agent starts with the map and navigates to specific docs on demand.
Agent output drifts without active correction. Agents replicate patterns from the codebase, including uneven or suboptimal ones. Left alone, this compounds into architectural drift. OpenAI’s team found they were spending 20% of engineer time manually cleaning up agent-generated code before they automated the process.
What worked for them was encoding “golden principles” into the repository and running recurring cleanup agents that scan for deviations and open targeted refactoring PRs. They call it garbage collection for code quality. Both problems, drift in the conversation and drift in the output, need ongoing attention. You can’t set it up once and walk away.
Every layer that follows is an implementation of these principles.
Layer 8: Skills
Part 1 showed that context files like CLAUDE.md give the agent persistent instructions. Skills take this further: they’re packaged workflows that the agent can load on demand, complete with instructions, scripts, reference documentation, and metadata.
A skill is a directory with a SKILL.md file at its root. The metadata at the top of the file declares the skill’s name, a description, which tools it can use, and optionally shell commands to run for fresh context. The body contains the step-by-step instructions the agent follows.
This convention is shared across Claude Code, Codex, and OpenCode. No build step, no registration API. You create a directory, write a markdown file, and the agent discovers it.
A skill can be as simple as a markdown file with instructions, or it can include executable scripts the agent calls via the Bash tool, reference documentation that gets injected into context, and metadata controlling UI appearance and invocation policy.
The important distinction is between what the model reads and what runs outside it. Instructions and references become tokens in the context window. Scripts run as shell commands, and only their output enters context.
Because of this split, you can put deterministic logic (a deploy script with lock checking and rollback) into a script that runs reliably every time, while the agent handles the judgment calls around it: when to deploy, whether to proceed after a warning, how to interpret a failure.
Discovery and precedence
Skills are discovered from multiple directories, and the order determines which one wins when names collide. In all three codebases the precedence is the same: project-level skills override user-level skills, which override system defaults.
The specific directories differ by tool: Claude Code scans .claude/skills/, Codex scans .codex/skills/, and OpenCode scans .opencode/skills/ (and also reads the .claude/skills/ layout for compatibility). Plugins contribute their own skill roots into the same pipeline. If the same skill is reachable through multiple paths or symlinks, it’s deduplicated by resolved filesystem path and loaded only once.
Some skills only apply when specific files are involved. Claude Code supports conditional activation: skills with paths in their frontmatter are dormant until the agent touches a matching file. A skill for database migrations can declare paths: ["**/migrations/**"] and stay invisible until the agent reads or edits a migration file. This further reduces the context cost of having many skills installed.
Progressive disclosure
The key design decision is that skills are lazy-loaded. At startup, the agent reads only the name and description of every available skill. The full content, which can be thousands of tokens of instructions, scripts, and references, stays on disk until the agent decides it needs a particular skill for the current task. This means you can have dozens of skills installed without paying the context cost for all of them on every turn.
The agent can activate a skill in two ways. Explicit invocation is when you type /deploy or $deploy to invoke a skill by name. Implicit invocation is when the agent reads your prompt, scans the skill descriptions, and decides that a skill matches the task. In both cases, the LLM is the router. There is no hardcoded mapping from keywords to skills.
The description field is what determines implicit matching, so writing clear, scoped descriptions matters. A description like “Deploy to staging or production environments with safety checks” gives the agent enough signal to match on “push this to staging” without false-triggering on “set up a new deployment pipeline.”
Codex adds an extra safeguard: plain-name mentions (like $deploy) only resolve when there is exactly one matching skill. If multiple skills share similar names, the ambiguous mention is ignored rather than silently loading the wrong one.
Skills can also chain into a lifecycle. Instead of invoking them one at a time, you can map slash commands to development phases. Each command activates one or more skills relevant to that phase, and the output of one phase becomes the input to the next.
One pattern that’s emerged in community skill design is the no-shortcuts table: a section listing the justifications the model is likely to generate for skipping steps, paired with counter-arguments. LLMs are good at talking themselves into shortcuts (“this is simple enough to skip testing,” “I’ll add error handling later”), and instructions alone don’t prevent it. The table works because it puts the counter-argument directly in the model’s context at the moment it would otherwise take the shortcut.
A related pattern is explicit stopping conditions. Skills don’t just say what the agent should do. They say when it should stop and yield control back to the human. A well-designed skill includes branching points where the agent is instructed to pause, name its uncertainty, present options, and wait rather than guess.
Dynamic context injection
Some skills need fresh data that doesn’t exist until runtime. A deploy skill might need the list of currently open PRs. A migration skill might need the current database schema.
Skills handle this with context commands: shell commands declared in the skill’s metadata that run before the instructions are sent to the model. The output gets injected alongside the skill content, so the agent reads it as part of its prompt.
context:
  - command: gh pr list --state open --json number,title
    description: Currently open PRs
  - command: psql $DATABASE_URL -c '\dt' --no-psqlrc
    description: Current database tables
This is a form of RAG (from Part 1) applied at the skill level: instead of putting all possible context into the prompt upfront, you run a targeted query and add only the relevant results.
Isolation
Skills can also run in a subagent fork, which means the skill’s instructions execute in a fresh context window (as described in Part 1’s subagent section) rather than in the main agent’s context. This is useful for skills that need a lot of working space, like a code review skill that reads many files. The main agent’s context stays clean, and only the skill’s final output comes back.
Plugins: distributing skills
A skill sitting in your project’s .claude/skills/ directory works for that project. But if you build a skill that’s useful across projects, you need a way to package and share it.
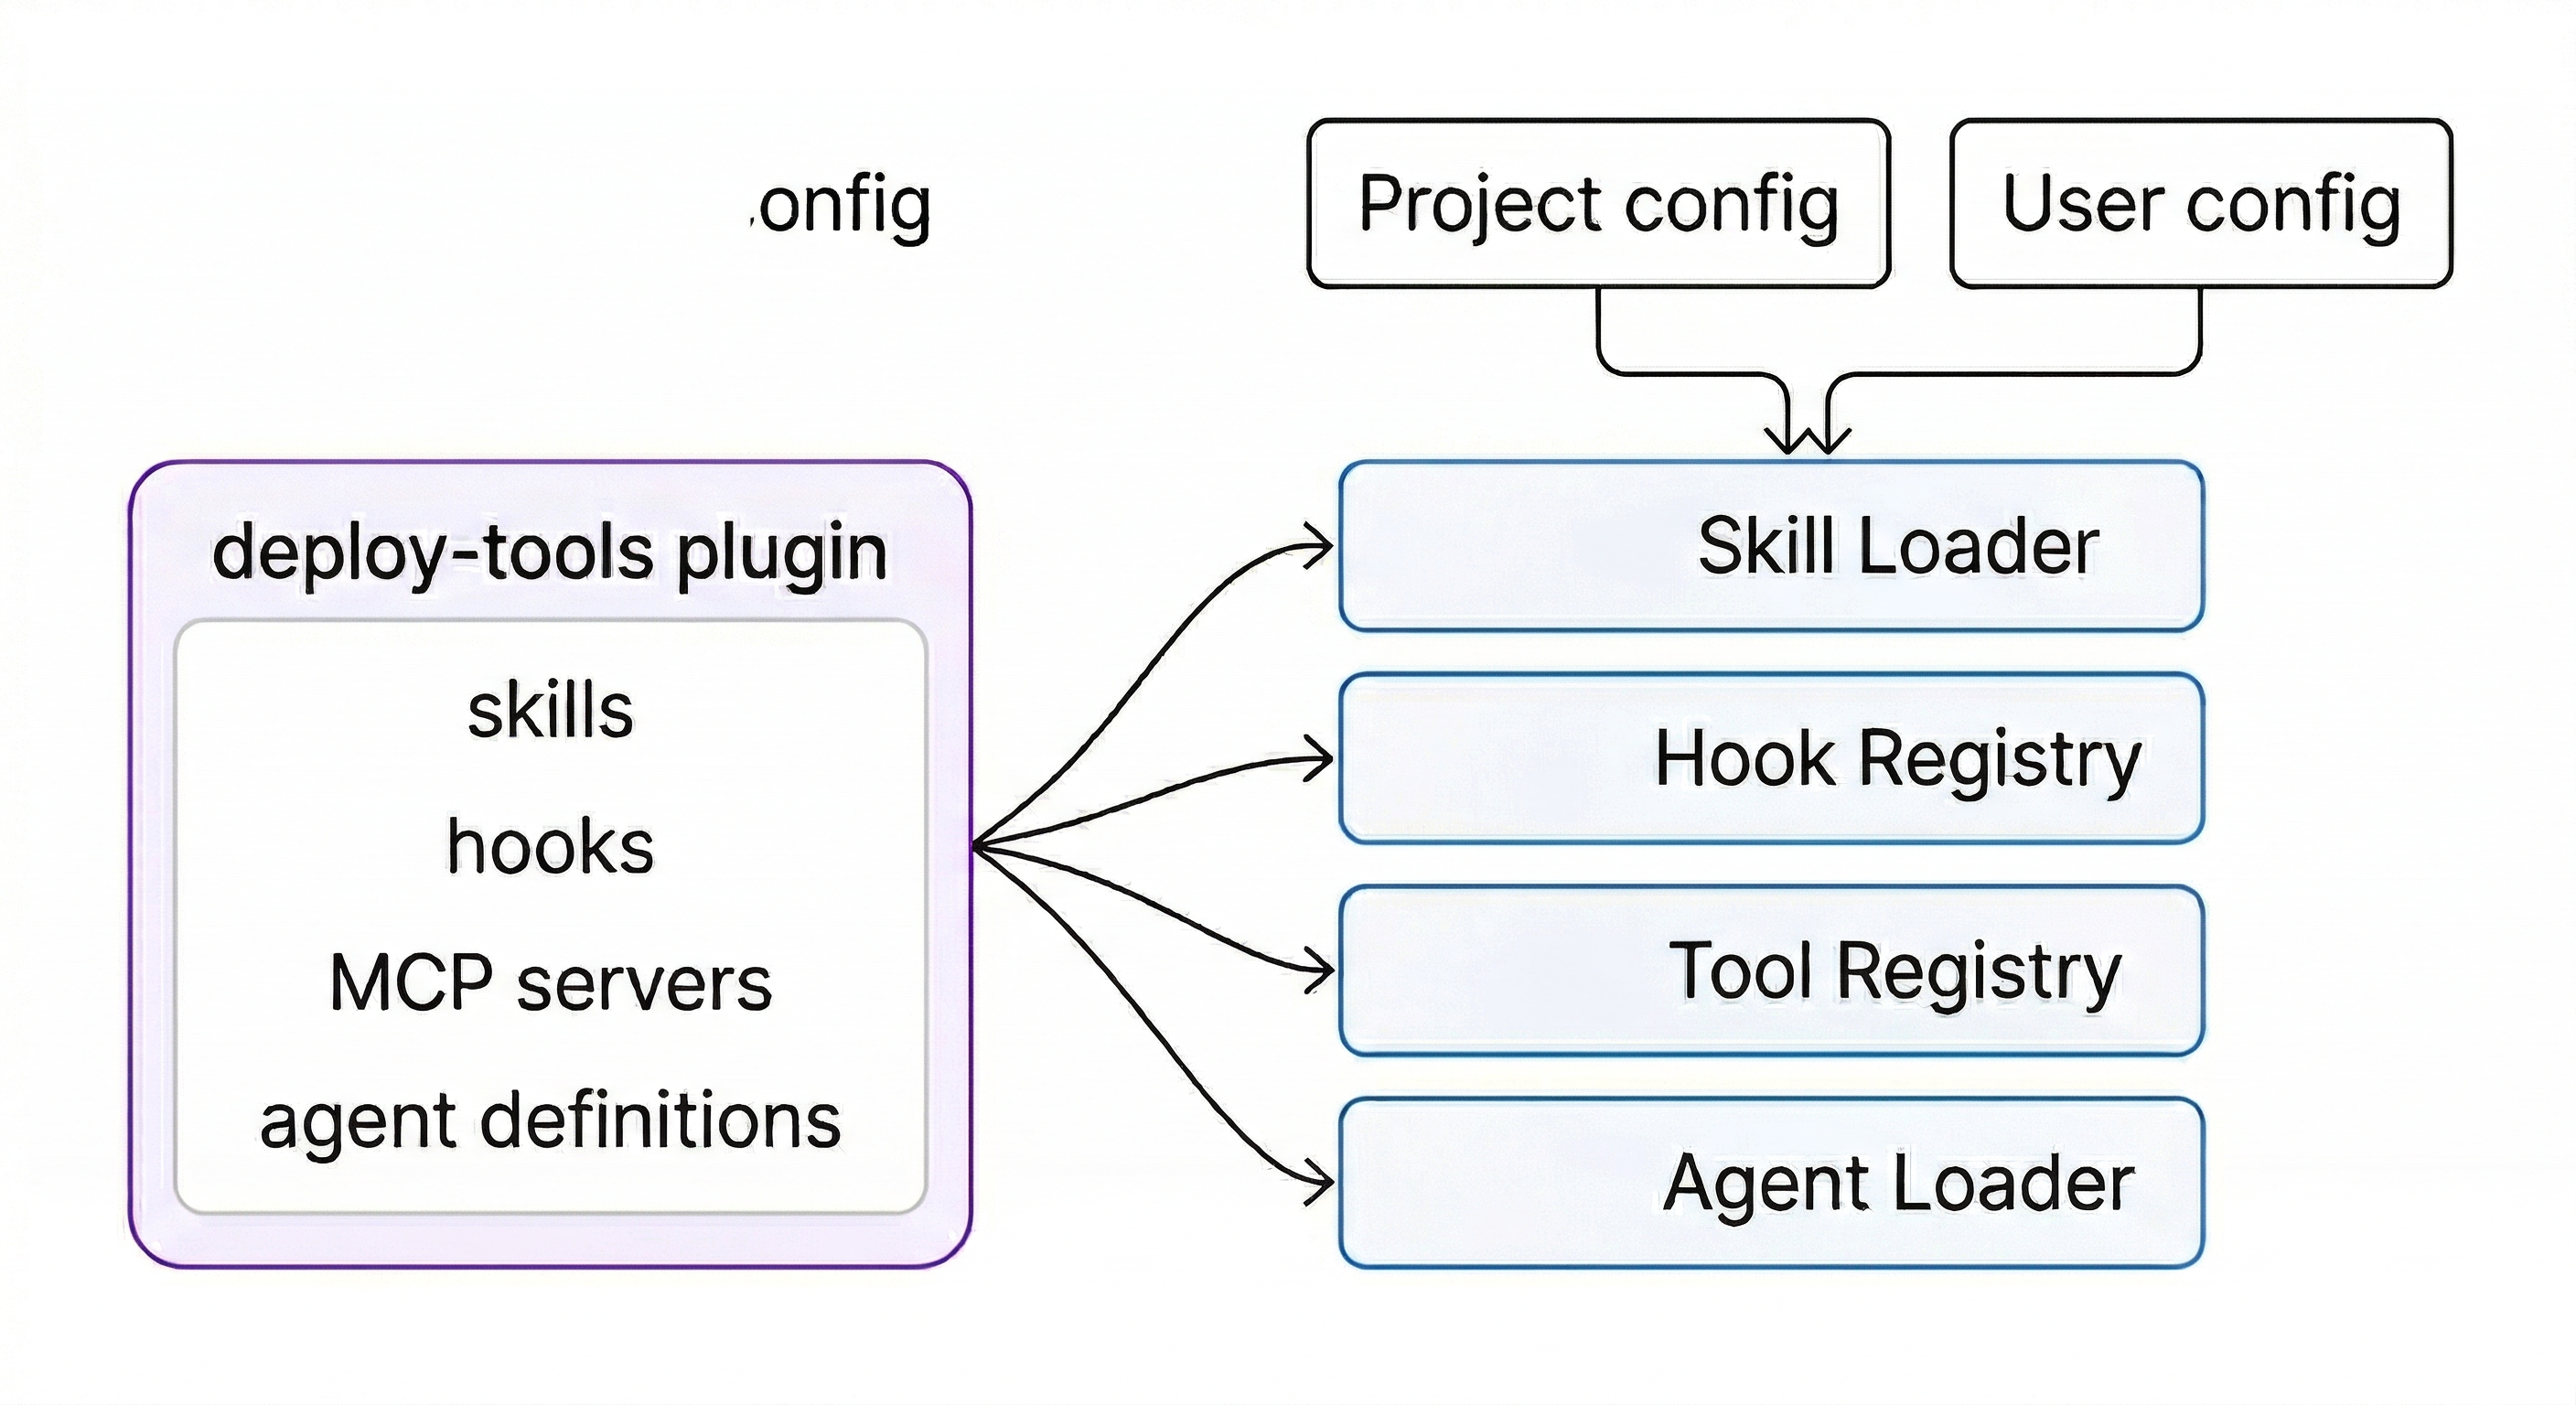
Plugins solve this. A plugin bundles one or more skills (plus optional agents, hooks, and MCP servers) into an installable unit with a namespace to prevent conflicts. When you install a plugin named deploy-tools, its skills become available as /deploy-tools:deploy and /deploy-tools:rollback. Both Claude Code and Codex have plugin directories where you can browse and install community-contributed plugins.
The important design choice is that plugins are bundles of existing primitives, not a separate abstraction. A plugin doesn’t introduce new execution models or runtime concepts. It feeds skills, hooks, MCP servers, and agent definitions into the same pipelines that project-level and user-level configs use. The plugin system is just a packaging and distribution layer on top of mechanisms that already exist.
All three codebases also sanitize plugin-contributed content before it enters the model’s context. Codex truncates plugin descriptions to a maximum length before injecting them into the system prompt, preventing plugins from stuffing arbitrary text into the context window.
Claude Code makes a separate distinction: plugin code (version-scoped, replaced on update) is kept apart from plugin data (persistent, survives updates). This matters because plugins often accumulate state like cached API tokens or downloaded reference data that shouldn’t disappear every time the plugin updates.
The progression is: start with a skill in your project directory, iterate until it works well, then package it as a plugin when you want to share it. The skill format is the same either way. Community plugin directories already have bundles packaging a dozen or more skills that cover entire development lifecycles, from spec writing through shipping, as a single install.
Layer 9: Hooks
Part 1 introduced hooks as code that inspects tool calls and decides whether to allow, block, or modify them. That covered the concept. This section covers the full lifecycle, because hooks fire at many more points than just tool calls, and they can do more than just gate decisions.
The hook event lifecycle
A hook is a shell command, a function in your code, or an HTTP endpoint that fires at a specific point in the agent’s lifecycle. The events span the full session:
- SessionStart fires once when the session begins. Use it for environment checks or to inject a meta-skill that teaches the agent how to find and use all other skills.
- PreToolUse fires before every tool execution. This is the most common hook: check the tool name and arguments, then exit 0 (allow), exit 2 (block), or modify the arguments.
- PostToolUse fires after every tool execution. The tool has already run and you can’t change the result, but you can trigger side effects like auto-formatting a file that was just edited, or writing to an audit log.
- Stop fires when the agent produces its final response with no tool calls. Use it to validate the result, save a summary, or trigger downstream workflows.
- SubagentStart and SubagentStop fire when subagents spawn and complete. Use them to track parallel work.
- Notification fires when the agent wants to alert the user about something (like a doom loop). You can route these to Slack, email, or desktop notifications.
Scrub through a real session to see how these events fire and what data flows through each one:
Matchers
Not every hook should fire on every event. Matchers let you scope a hook to specific tools. A matcher of "Bash" means the hook only fires on Bash tool calls. "Edit|Write" fires on either Edit or Write. Without a matcher, the hook fires on every tool call of that event type.
This is what makes hooks practical. A PostToolUse hook that runs prettier should only fire after Edit or Write, not after Read or Grep. A PreToolUse hook that blocks destructive commands should only inspect Bash calls, not file reads.
The decision chain
When the model outputs a tool call, it doesn’t go straight to execution. It flows through a chain of checks, and the first “no” wins. Toggle the gates below to see how removing security layers changes what gets through:
The exit code protocol is simple: exit 0 means “this hook has no objection, continue to the next check.” Exit 2 means “block this tool call and send a rejection message back to the model.” The model then receives something like “Blocked by hook: destructive command targeting sensitive directories” as the tool result, and has to try a different approach.
Why exit code 2 instead of the more obvious exit code 1? Because all three codebases follow the same principle: a broken hook should not stop the agent. Exit 1 means the hook itself crashed (syntax error, missing dependency). That gets logged as a warning, but the agent keeps going. Only exit 2, a deliberate signal, can actually block a tool call. Codex goes further: even a well-formed block must include a non-empty reason field, or it gets downgraded to a warning.
exit 2 block must include a non-empty reason field, or it gets downgraded to a warning.There’s another layer to this: hooks can only make things stricter, never more permissive. If an organization or user has blocked a tool (say, WebSearch is denied in the project config), a hook returning allow doesn’t override that. The permission system checks hooks and config independently, and the most restrictive answer wins. This means a third-party plugin can’t install a hook that quietly re-enables something an admin turned off.
Beyond shell commands
The simplest hooks are shell scripts: a short bash one-liner that checks a condition and exits with the right code. But hooks can also be:
- HTTP hooks that call an external service. Useful for centralized policy enforcement: the hook sends the tool call to your security service, which checks it against org-wide rules.
- Prompt-based hooks (in Claude Code) that use a single LLM call for judgment. Instead of writing rules for every case, you describe the policy in natural language and the hook model decides. More flexible than pattern matching, but slower and non-deterministic.
- Agent-based hooks that spawn a subagent with tool access. The hook agent can read files, check state, and make a nuanced decision. Expensive, but useful for complex validation like “check that this database migration is reversible.”
Most practical setups use shell hooks for the fast, common checks (block rm -rf, auto-format after edits) and reserve the more expensive hook types for high-stakes decisions.
// Three hooks working together in settings.json
{
  "hooks": {
    "PreToolUse": [{
      "matcher": "Bash",
      "hooks": [{
        "type": "command",
        "command": "... | grep -q 'rm -rf' && exit 2"
      }]
    }],
    "PostToolUse": [{
      "matcher": "Edit|Write",
      "hooks": [{
        "type": "command",
        "command": "... | xargs npx prettier --write"
      }]
    }],
    "Stop": [{
      "hooks": [{
        "type": "command",
        "command": "curl -X POST $SLACK_WEBHOOK -d ..."
      }]
    }]
  }
}
An instruction in CLAUDE.md says “please don’t delete files outside the project.” A hook actually prevents it.
A related pattern from OpenAI’s harness engineering team: custom lint error messages as agent guidance. Because their linters are custom-built, they write error messages that include remediation instructions. When a lint fails in CI, those instructions enter the agent’s context on the next turn. The linter acts like a hook, just routed through CI instead of the hook config. Same principle: encode the rule as an executable check and put the output where the agent will see it.
Layer 10: Custom subagents
Part 1 covered subagents for context isolation: the parent spawns a child with a fresh context window, the child does focused work, and only the summary returns. Part 1 also showed the built-in types (explore for read-only research, general for full tool access). This section covers what happens when you define your own.
Defining a custom agent
A custom agent is a configuration file that specifies a system prompt, a model, a set of allowed tools, and a permission mode. The file goes in a known directory (.claude/agents/ for Claude Code, .codex/agents/ for Codex), and the agent becomes available for the parent to delegate to.
The format varies by tool (markdown with YAML frontmatter, TOML, or JSON), but the fields are the same:
- name and description: how the parent agent identifies and selects this agent.
- developer_instructions: the system prompt. This is where you define the agent’s behavior and constraints.
- model: which model to use. A fast, cheap model like Haiku for simple research. A powerful model like Opus for complex reasoning.
- tools: which tools the agent has access to. A reviewer agent might only get Read, Glob, and Grep. A fixer agent gets Edit and Bash too.
- sandbox_mode / permission_mode: read-only, accept edits, or full access.
The pattern across all three codebases is that agents are configurations, not code. A custom agent is a name, a system prompt, a tool allowlist, and a model choice, written in a markdown file. No classes to subclass, no interfaces to implement. This makes agents trivially user-definable and shareable as files in a repository.
The key insight is that restricting an agent makes it better at its job. An agent with all tools and generic instructions will try to do everything and do nothing well. An agent with only Read and Grep, a focused system prompt (“find security vulnerabilities, cite CWE IDs, ignore style issues”), and a cheap fast model will cost less, run faster, and often find more issues because it’s not distracted by irrelevant possibilities.
OpenCode has a nice approach to this: rather than maintaining separate tool registries per agent, the same tools are available to all agents, and permissions gate access. When you add a new tool, existing permission rules apply automatically without any per-agent wiring.
In practice, the system prompt for a specialized agent often looks like a full skill. A code review agent’s prompt might grade on correctness, readability, security, and performance, classify findings by severity, and format output in a structured template. The field is technically just text, but the effective ones contain complete workflows. The agent follows the process embedded in its prompt rather than making one up as it goes.
Context inheritance and safety
When a parent agent spawns a subagent, how much context should the child inherit? The answer varies by implementation, but all three codebases treat this as a spectrum rather than an all-or-nothing choice.
OpenCode gives each subagent a completely separate session. The child has no access to the parent’s conversation history. The only bridge is the prompt passed in and the text result passed back. This is the cleanest isolation model, but it means the prompt must carry all the context the child needs.
Claude Code offers a middle ground: the child gets its own hooks and abort controller, but can optionally inherit the parent’s conversation via a fork. Because the forked child starts with the same conversation prefix as the parent, multiple subagents spawned in parallel can reuse the same API cache. Each one gets a different directive appended to the same shared history, which saves on cost.
Codex provides the most granular control with fork-turns: instead of choosing between “no context” and “all context,” you can specify the exact number of recent turns to inherit. fork_turns: "3" gives the child the last 3 user-turn boundaries from the parent’s history. This lets the model match the context inheritance to the task: a quick file lookup needs no parent context, while a debugging task might need the last few exchanges.
All three codebases also prevent infinite spawning by default. OpenCode denies the task tool in child sessions unless explicitly configured. Claude Code uses an anti-recursion guard that detects when code is running inside a fork child. Codex requires explicit user authorization before the model can spawn subagents at all.
Delegation should be intentional, not emergent. An agent that can spawn agents that spawn more agents is a resource leak.
Why custom agents matter for cost and quality
Consider a code review task as an illustrative example. The default agent reads 8 files, notices some security issues, some style issues, some performance concerns, and produces a mixed report. Using Opus (expensive, thorough) with all tools (wide context), a review like this might cost roughly $0.14.
Three specialized agents running in parallel could look like this:
- A security reviewer with Sonnet, read-only tools, focused prompt. Finds 4 security issues including 2 the default missed. Cost: ~$0.02.
- A performance auditor with Haiku, read-only tools, different prompt. Finds 3 performance issues. Cost: ~$0.01.
- A test reviewer with Haiku, read-only tools. Identifies coverage gaps. Cost: ~$0.01.
Total: ~$0.04 for better results than the ~$0.14 default run. The exact numbers vary by codebase and model pricing, but the pattern holds: specialization is a lever for both cost and quality.
Agent teams
Subagents report results back to the parent. They can’t talk to each other. If the security reviewer finds a SQL injection and the performance auditor finds that the same code also has a missing prepared statement, neither one knows about the other’s finding.
Agent teams (currently experimental in Claude Code) change this. Instead of a parent-child hierarchy, teammates share a task list and communicate directly with each other. The security reviewer can message the performance auditor: “I found raw SQL in login.ts, is this also a perf issue?” The performance auditor can confirm and add detail. The test reviewer can chime in: “No test covers that code path either.”
Agent teams cost more tokens (each teammate is a separate model session communicating via messages) and add coordination overhead. They work best for tasks where cross-checking and lateral discussion genuinely improve the result, like multi-faceted reviews or debugging with competing hypotheses. For straightforward delegation (“review these 8 files independently”), subagents are cheaper and simpler.
Layer 11: The Agent SDK
Everything so far describes configuration of an interactive tool. You type prompts, the agent works, you review results. Part 1’s Layer 7 showed that the same loop can run non-interactively via CLI flags and webhooks. The Agent SDK goes further: it makes the entire loop available as a Python or TypeScript library.
The same loop, as a library
All three agent SDKs share a core design principle: the SDK wraps the same binary or server that powers the CLI, rather than reimplementing the agent loop. The transport varies (in-process function call, CLI subprocess over stdio, HTTP server with SSE) but the result is the same: SDK behavior exactly matches CLI behavior because they share the same code.
The SDK exposes a single core function, query(), that takes a prompt and configuration options and returns an async stream of typed messages. The loop from Part 1 (evaluate, tool call, execute, inject result, repeat) runs inside the SDK. Your code receives messages as they’re produced.
The four message types cover the full lifecycle:
- SystemMessage with subtype
"init"is always first: session metadata, model, tools. - AssistantMessage is Claude’s response each turn: text content and/or tool call requests.
- UserMessage is the tool results that feed back to Claude automatically.
- ResultMessage is always last: the final text, cost, token usage, session ID, and whether the task succeeded or hit a limit.
Your code decides how much to handle. For a batch job, you might only care about ResultMessage. For a UI, you’d stream AssistantMessage to show progress. For an audit pipeline, you’d inspect every UserMessage to log tool results.
All three SDKs also surface events you might expect to be hidden. Compaction boundaries show up as structured events in the stream, so your code can tell when the agent’s context was reset. Cost and token usage are reported per-turn and in the final result.
CLI concepts map 1:1 to the SDK
If you understand the CLI (which you do from Part 1), the SDK is the same concepts expressed as function arguments instead of config files and flags. Tools, hooks, subagents, permissions, sessions: they all have direct equivalents.
The biggest difference is hooks. In the CLI, hooks are shell commands declared in settings.json. In the SDK, hooks are native callback functions in your application code. This means they can access your application state, call your APIs, and make decisions using any logic you can write in Python or TypeScript, not just what you can express in a shell one-liner.
When to use the SDK vs the CLI
The distinction is straightforward:
- CLI for interactive development. You’re at the keyboard, exploring a problem, iterating on a fix.
- SDK for production automation. CI/CD pipelines, webhook handlers, scheduled jobs, custom applications that embed agent capabilities.
Many teams use both. A developer uses the CLI daily for writing code. The same project has an SDK-powered GitHub Action that runs code review on every PR, an SDK agent that triages Sentry errors overnight, and an SDK pipeline that updates dependencies weekly. The workflows translate directly because the underlying loop is identical.
The SDK also supports session resumption: capture the session ID from the result, and later resume with full context intact. This enables multi-step workflows where a human reviews the first pass, adds feedback, and the agent continues from where it left off rather than starting over.
The full stack
Between Part 1 and Part 2, the complete stack looks like this:
| Part | Layer | What it does |
|---|---|---|
| 1 | Token prediction | Text generation, one token at a time |
| 2 | Assembled prompt | System message, tools, context, history |
| 3 | Tool calling | Structured calls executed by the harness |
| 4 | Agent loop | Tool calls in a loop until done |
| 5 | Context management | Pruning, compaction, subagents, RAG |
| 6 | Permissions | Approval gates, permission modes |
| 7 | Automation | Non-interactive mode, webhooks |
| 8 | Skills | Reusable workflows, lazy-loaded |
| 9 | Hooks | Deterministic control over the loop |
| 10 | Custom subagents | Specialized agents for specific jobs |
| 11 | Agent SDK | The full loop as a library |
The bottom layers (1-4) are the machine itself: token prediction in a loop with tools. The middle layers (5-7) manage the machine’s constraints: context limits, safety, and automation triggers. The top layers (8-11) are about shaping the machine’s behavior without changing the machine. Teaching it new workflows, intercepting its decisions, specializing it for specific jobs, embedding it in your own systems.
The tools keep evolving. New skills get published, hook event types expand, subagent coordination improves, the SDK adds features. But the architecture from layers 1-4 is stable, and the patterns across layers 8-11 have converged. Claude Code, Codex, and OpenCode arrived at the same designs independently:
- Convention-based skill discovery with lazy loading
- Fail-open hook systems that distinguish broken hooks from intentional blocks
- Agents defined as configuration files rather than code
- SDKs that wrap the same binary rather than reimplementing the loop
When three different teams building on different models and in different languages converge on the same patterns, those patterns are probably load-bearing.
Understanding the layers makes the patterns make sense, and understanding the patterns makes the tools interchangeable.